User Stories
- An administrator wants to establish global settings for account-wide call recording processes.
- An administrator wants to record all support calls in a Call Center queue
- A user wants to record calls only on his/her office phone but not on her cell phone, which is also connected to the office account
- A user wants to be able to initiate a call recording session after the call has started.
- A support team wants to record incoming calls to track content/effectiveness of calls
Overview
This app provides the tools to manage both global and personal settings that define how calls can be recorded. It allows the manager to assign initial settings for each user and device within the account.
In some instances users can manage their personal recording settings from other end user apps such as SmartPBX, Callflows, comm.io and callthru.us. These settings are outlined at the end of this document.
NOTE:
The Callflows implementation of call recording uses an older set of APIs and features. We recommend using the Call Recording app instead as it
- Is more accessible by both agents and managers
- Is more secure, as the recorded calls are saved using Amazon Web Services
Before you Start
Recording calls requires an initial policy guideline review and a corporate setup at the account level.
- Decide at what level and for whom you want to enable call recording for
You can configure call recording settings at the Account level, the User level, the Device level, and/or as a callflow action. Some of these are achieved through different applications, this is outlined below.
- Know your privacy policies
Call recordings may be subject to privacy policies outlined by either a parent company or an industry standard. This is particularly true for calls that may have HIPAA connections. It is important you understand what kind of guidelines apply in order to implement a call recording plan.
- Set up an external storage account
All accounts must set up a storage account with a solution that is supported by your account setup. If your account is not yet configured, you will see this message when you launch the Call Recording app.
Note: In most cases if you are using our Call Recording, we will have already configured your storage solution for you.
Configuring your Call Recording settings
There are 3 levels of settings to consider for your default configuration: Account, Users, and Devices.
Account Tab
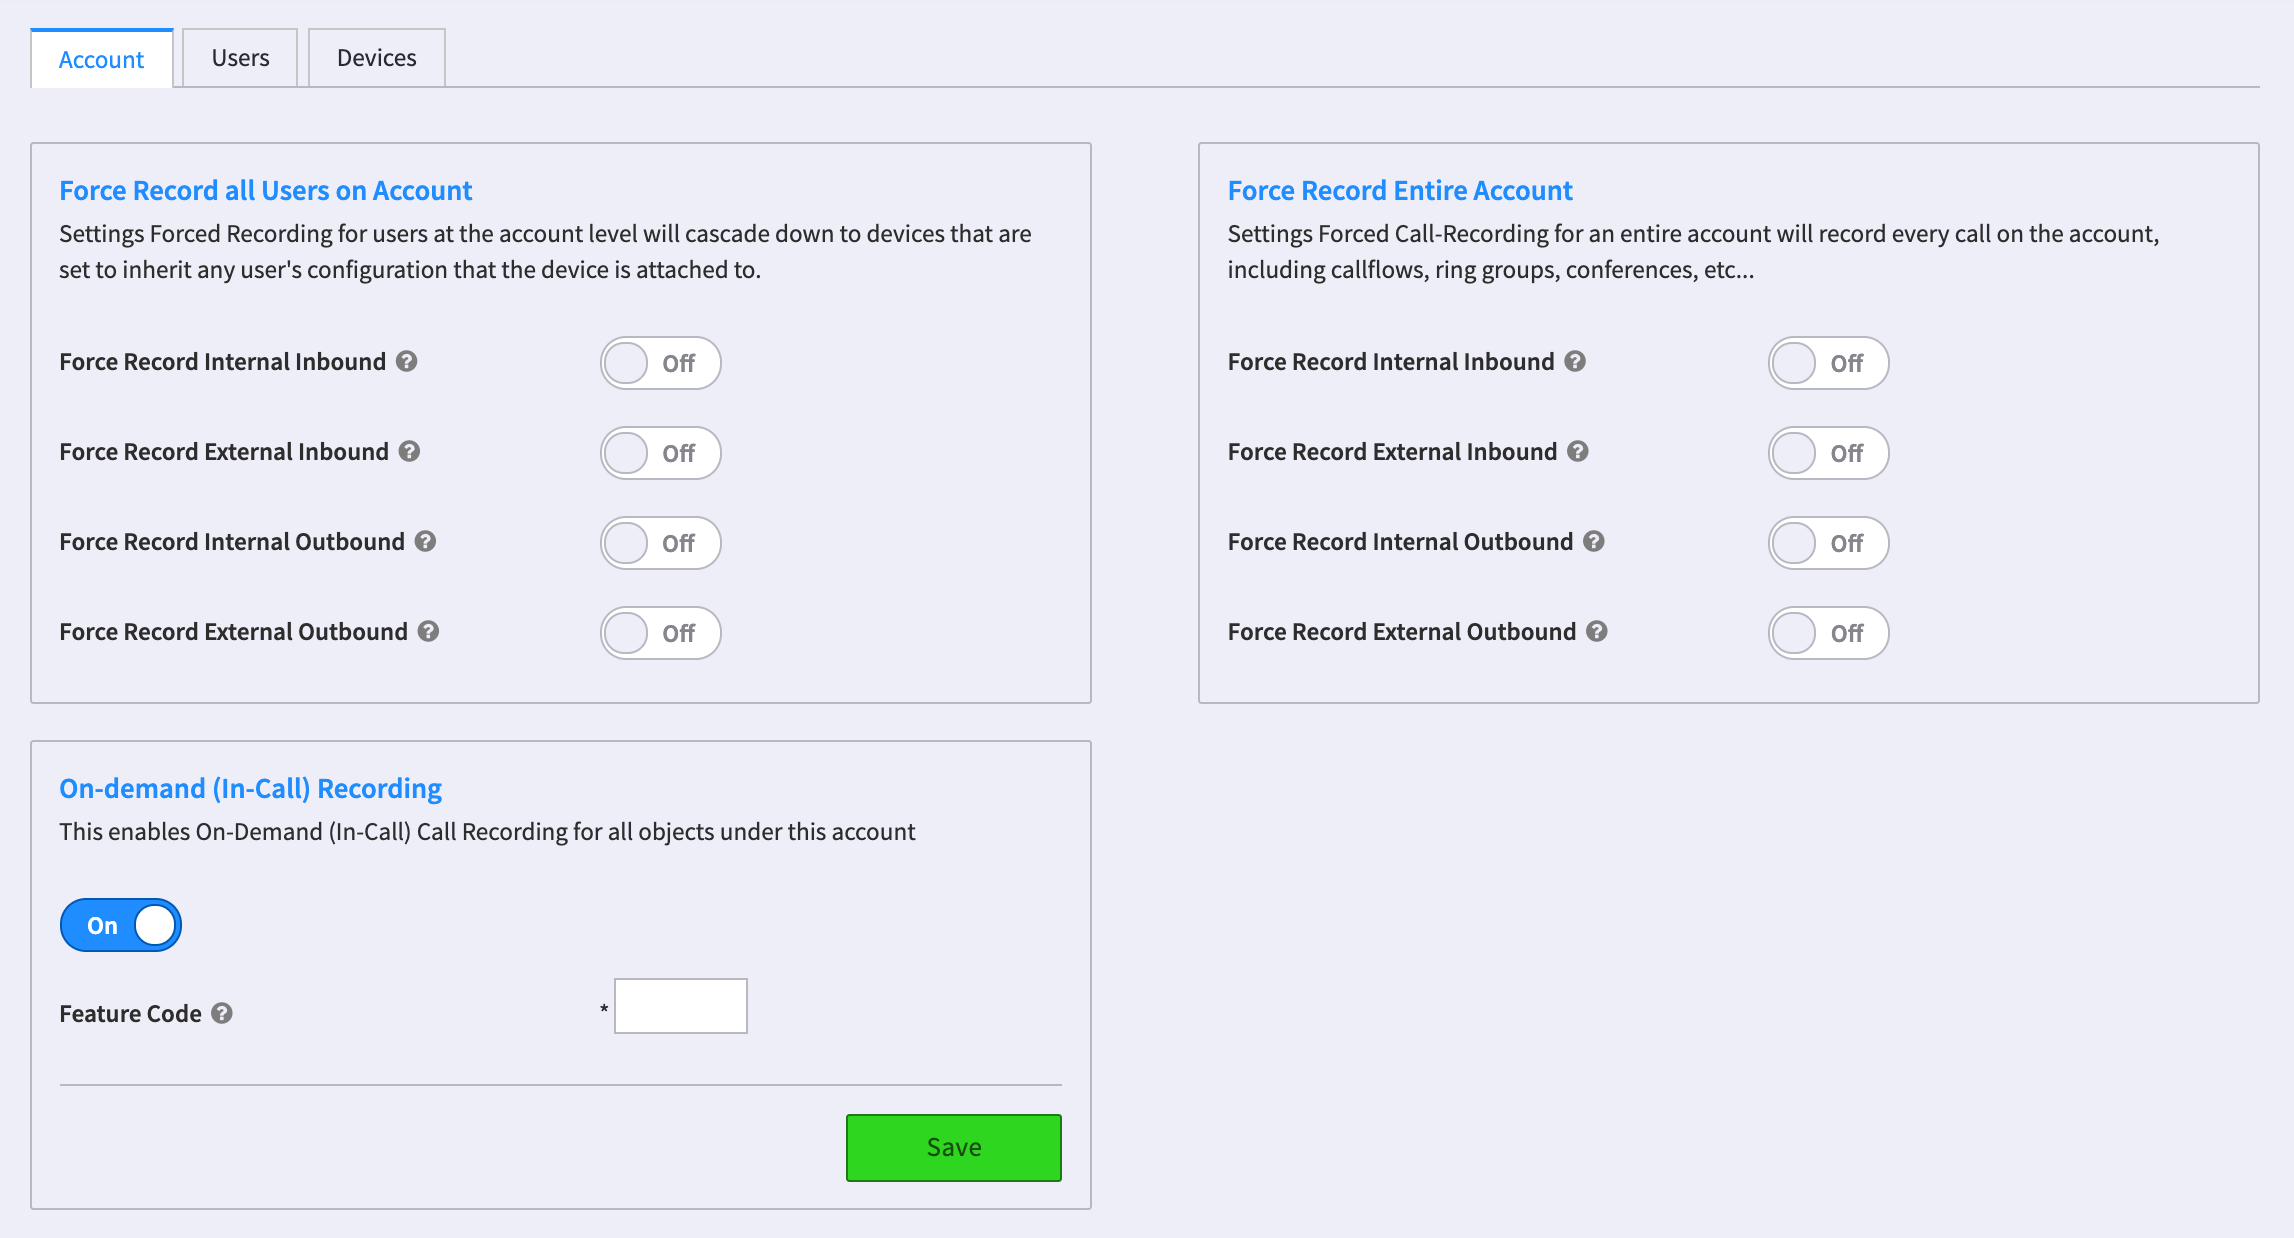
Force Record Settings
This allows an administrator to force-record types of calls.
- Force Record all Users
These settings will record any and all calls from any device associated with the use unless the device’s setting explicitly is set otherwise. You can indicate if you want to force inbound, outbound, and/or internal and external calls.
- Force Record Entire Account
These settings will record every call on the account, including callflows, ring groups, conferences, etc. unless specific settings for the user and/or device indicate otherwise. You can indicate if you want to force inbound, outbound, and/or internal and external calls.
NOTES:
- Account call recording settings are tracked separately from endpoint (user/device), so that a user/device may have turned it off while the account is set to on.
- Inbound vs Outbound is relative to the Account. If you set up recording on “Inbound” calls, the recording will be started on the originating leg (often called the a-leg) if the source network is matched. Conversely, outbound calls (from Your Account) will be recorded when “Outbound” settings are used.
On-demand (in-Call) Recording
If enabled, this allows all objects under the account to press a defined feature code during a call and start the recording. Make sure you enter a code that does not conflict with preset codes.
Users Tab
This section allows you to define per-user settings that override the default account settings.
- By default, all users will inherit the initial Account Settings.
- To access the override functions, select the gear to the right of each user.
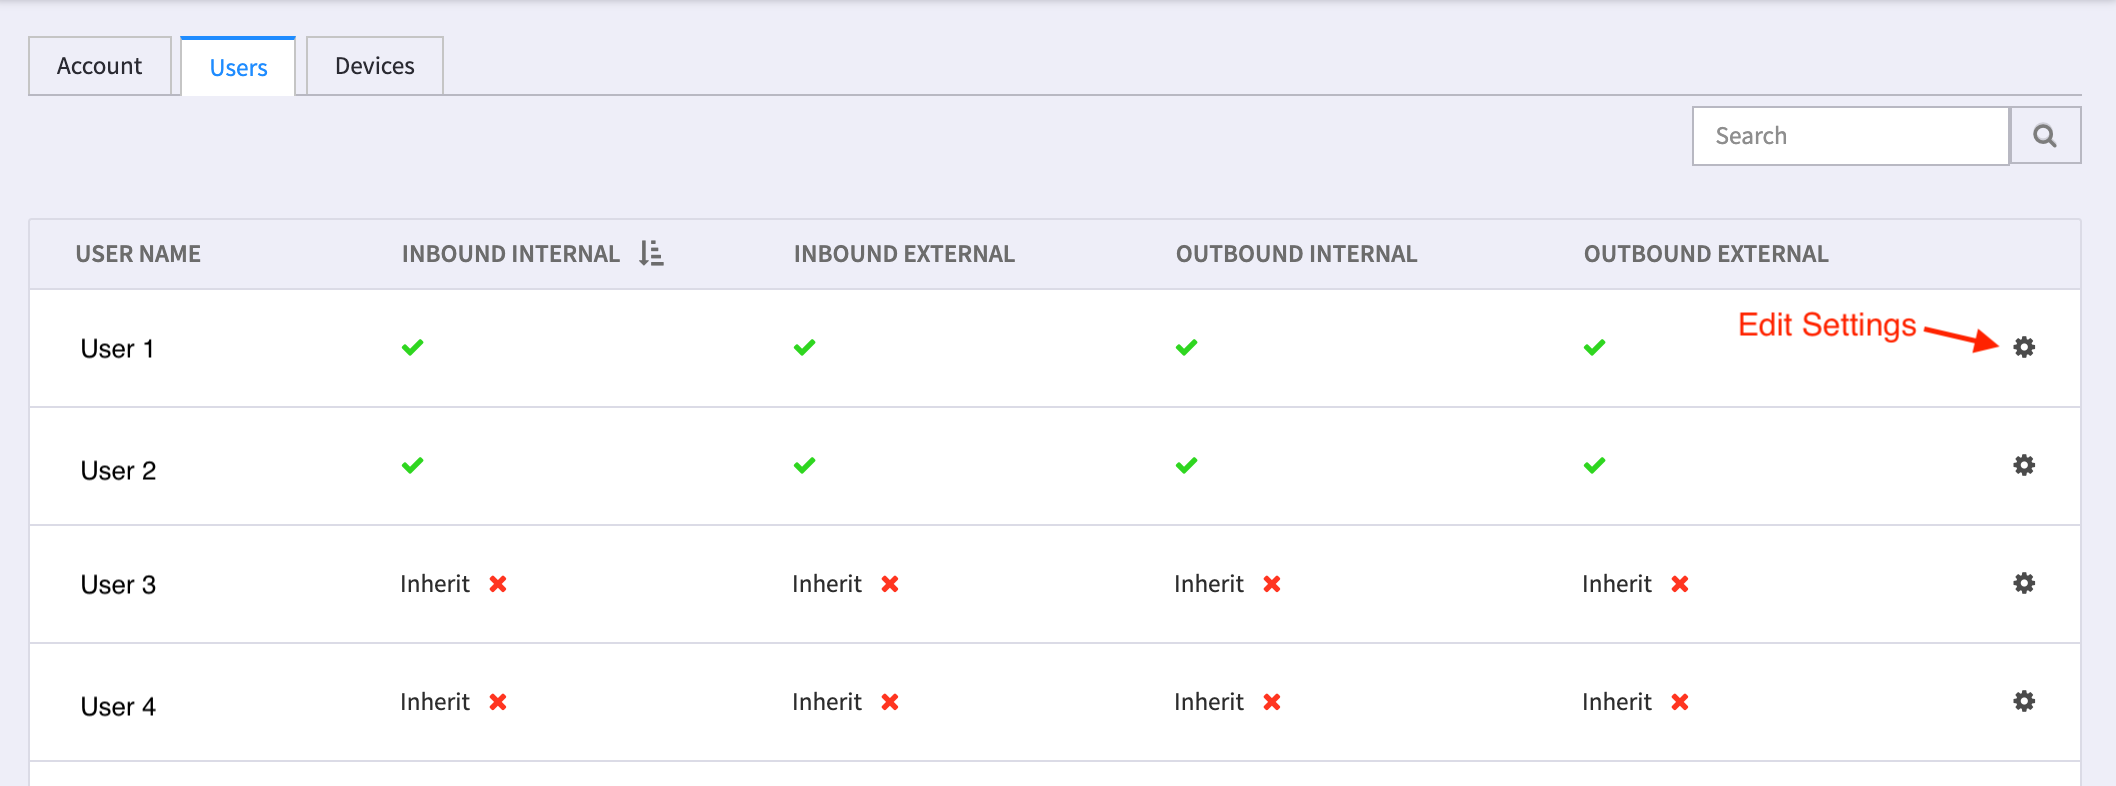
- Select the override options you want to apply to each user.
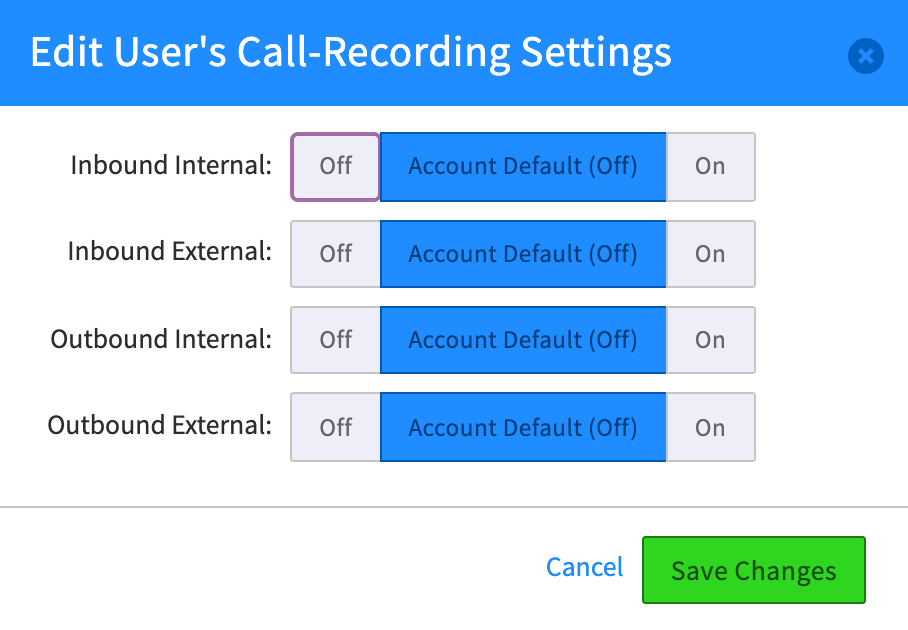
NOTE: The default setting is selected in this image, as the blue “Account Default”.
- To turn ON a recording option, select the ON
- To disable recording entirely, select the OFF.
Devices Tab
This section allows you to define per-device settings that override the default user settings.
- By default, all devices will inherit the User Settings. If the device is not associated with a User, the device will inherit from the Account Settings
- To access the override functions, select the gear to the right of each device.
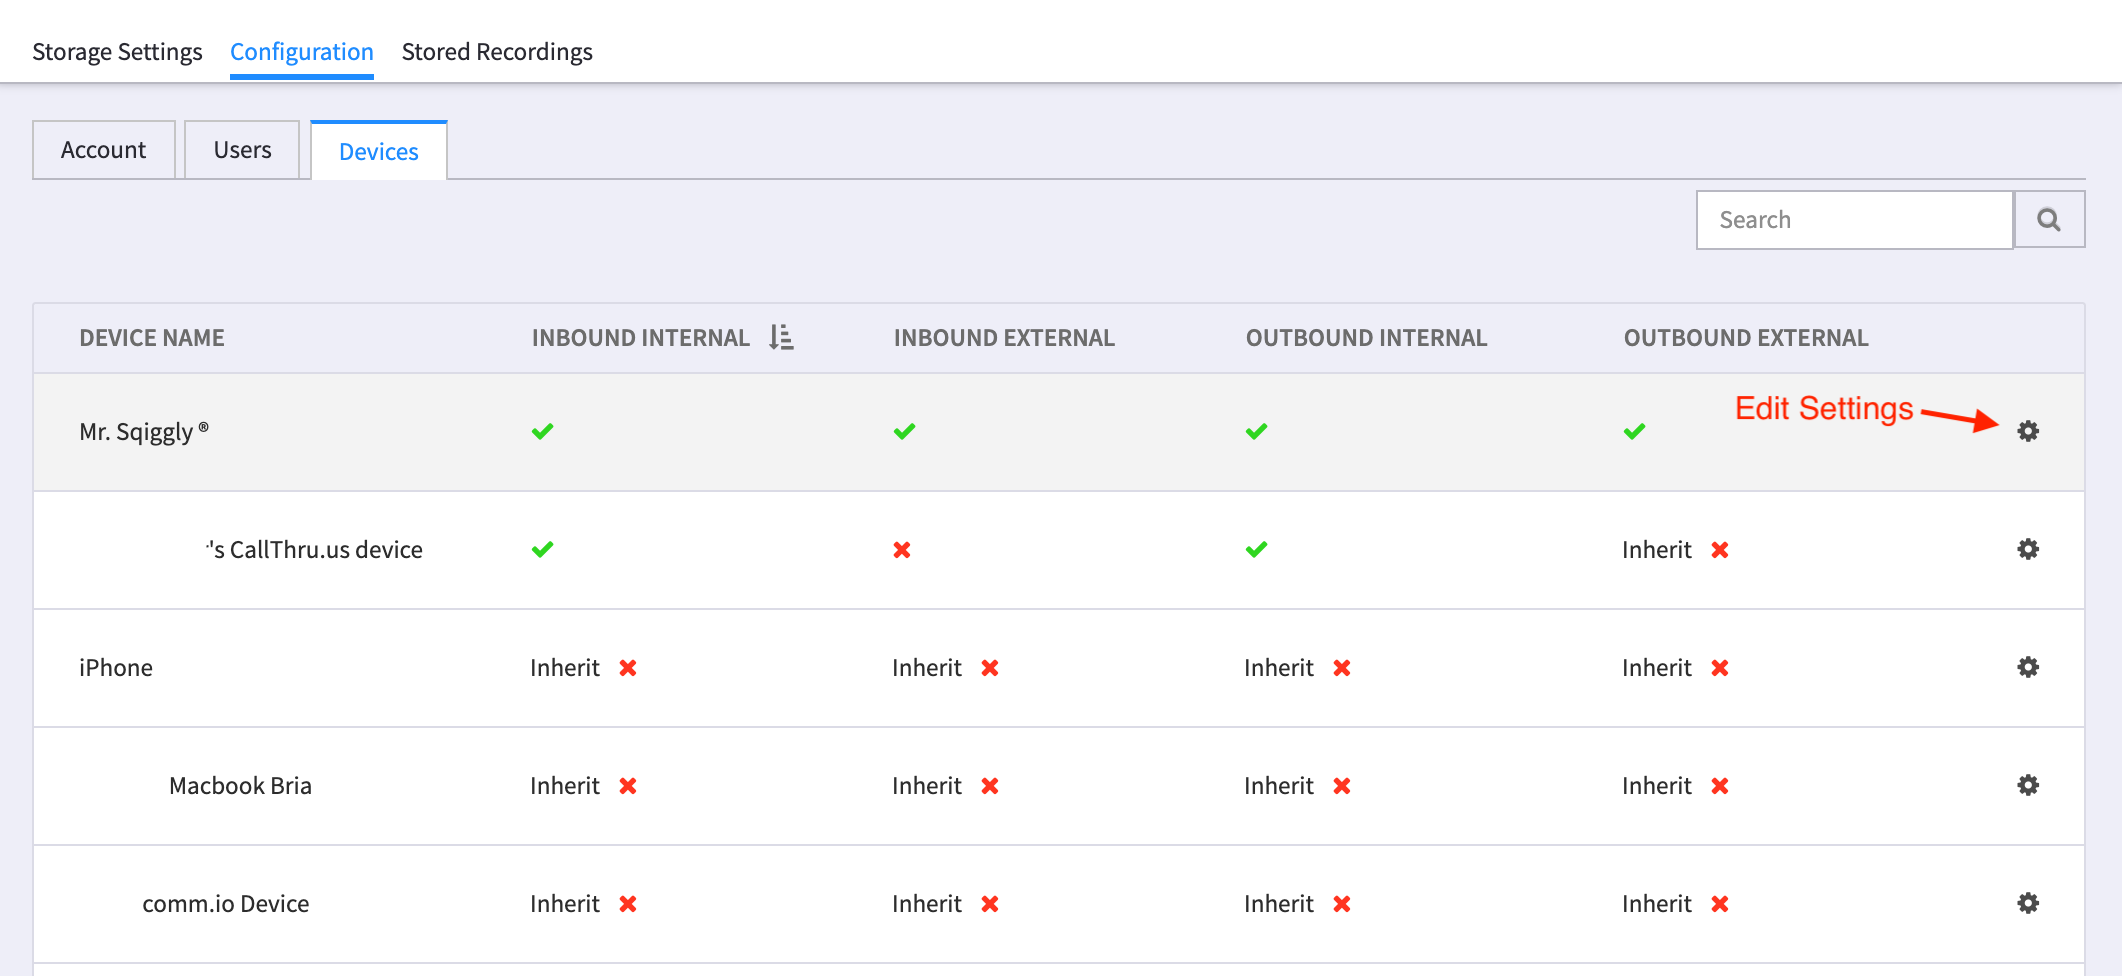
NOTE: The default setting is selected in this image, as the blue “Account Default”.
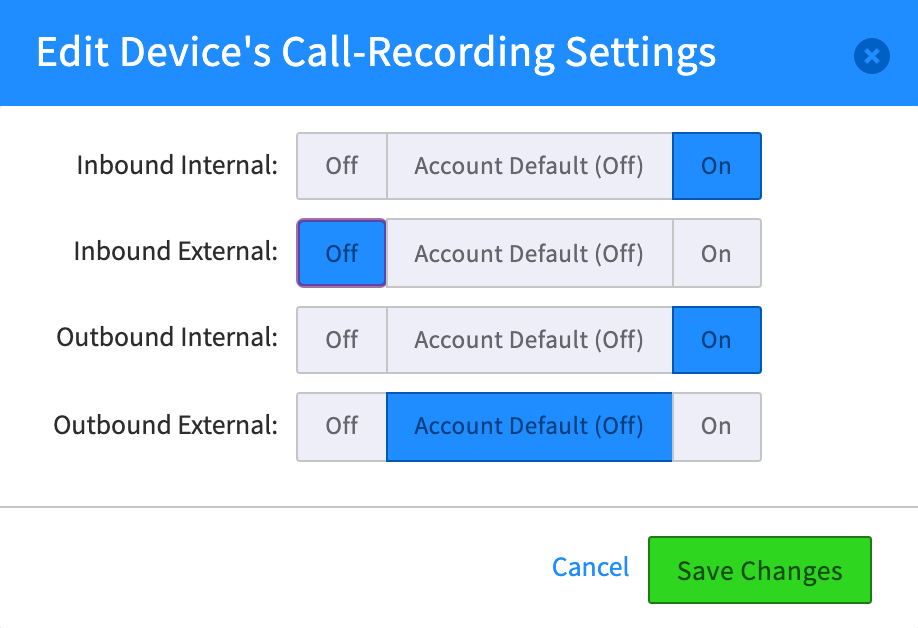
- To turn ON a recording option, select the ON
- To disable recording entirely, select the OFF.
Stored Recordings
The stored recordings tab lists all stored recordings. These can be filtered by date or by direction (inbound or outbound). You can also search for a specific name or number.
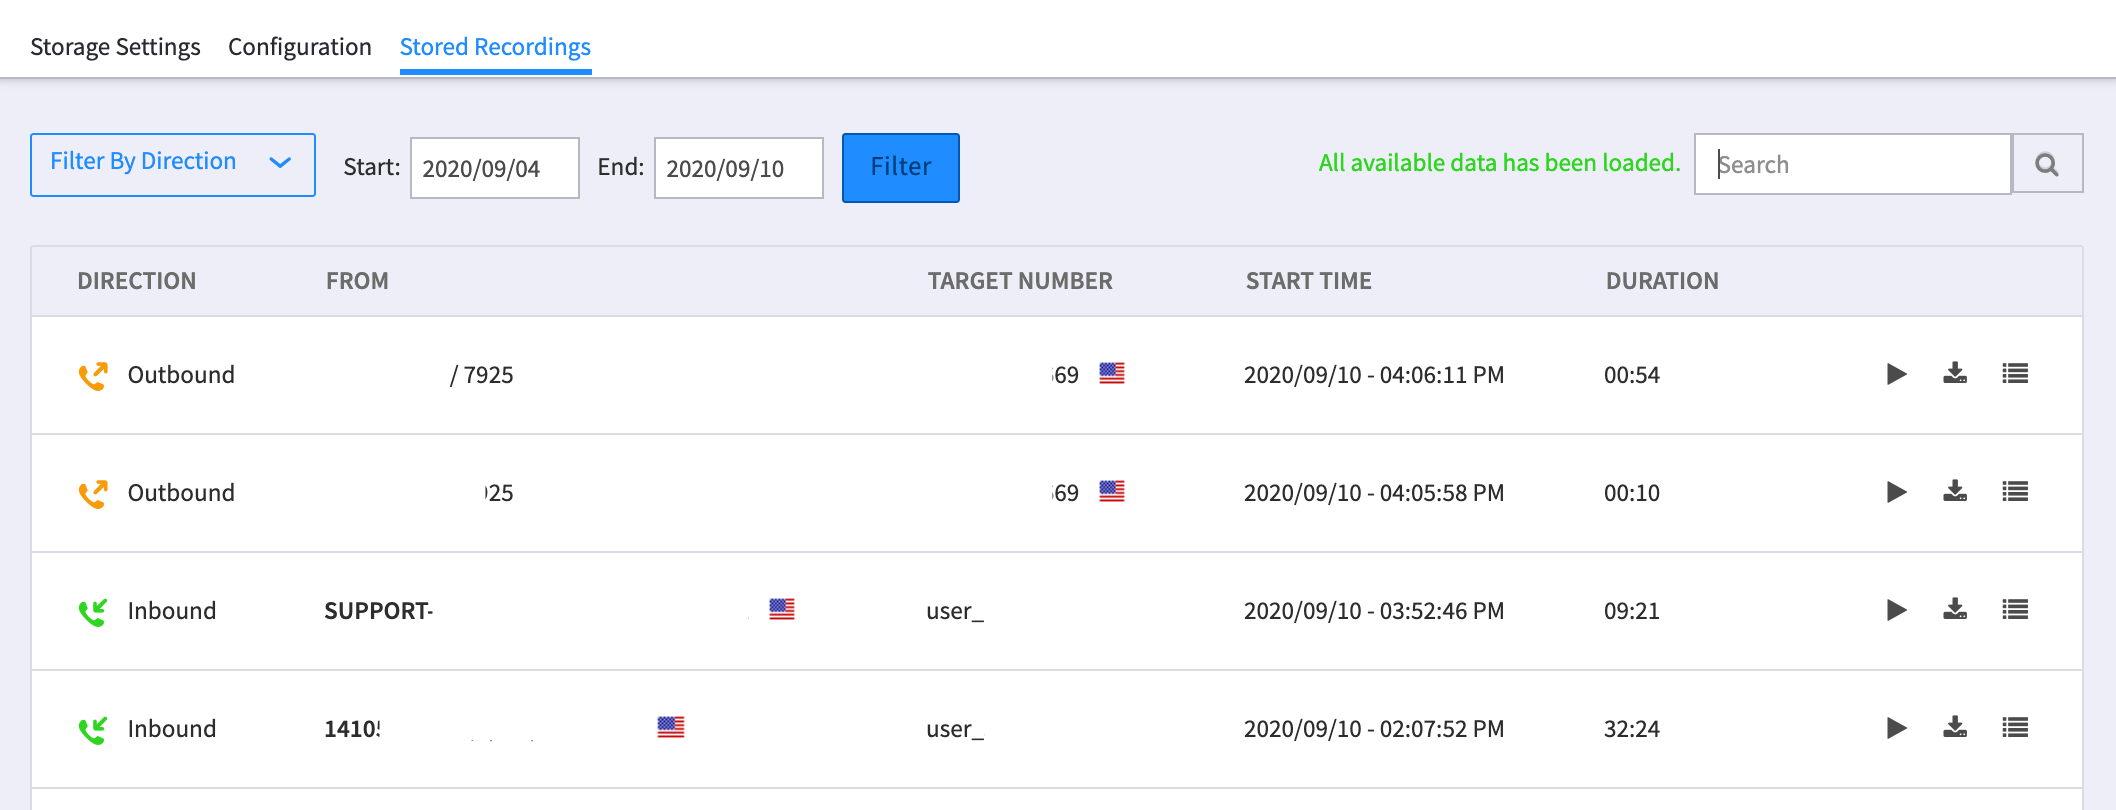
NOTE: “Inbound” and “Outbound” directions are labeled based on how our network processes the call. For example, a customer’s outbound call is considered first an inbound leg from the device to our network, and then an outbound leg from our network to the carrier. While future releases will combine these legs into a single outbound classification, currently you may see two legs shown for a single call.
For each recording you can select:

Play Recording
Managing Call Recording settings in User applications
Below you will see where and how users can manage call recording options from within our other applications.
NOTES:
- If you change a call recording setting within SmartPBX for example, then that change will likely be reflected in Conferences and SmartPBX. This may affect some routines you have customized (such as callflows); you will want to re-test these.
Call Recording settings in SmartPBX
User Settings — User Features
Click on User Features in the column next to your user name, and select Customized Call Recording.
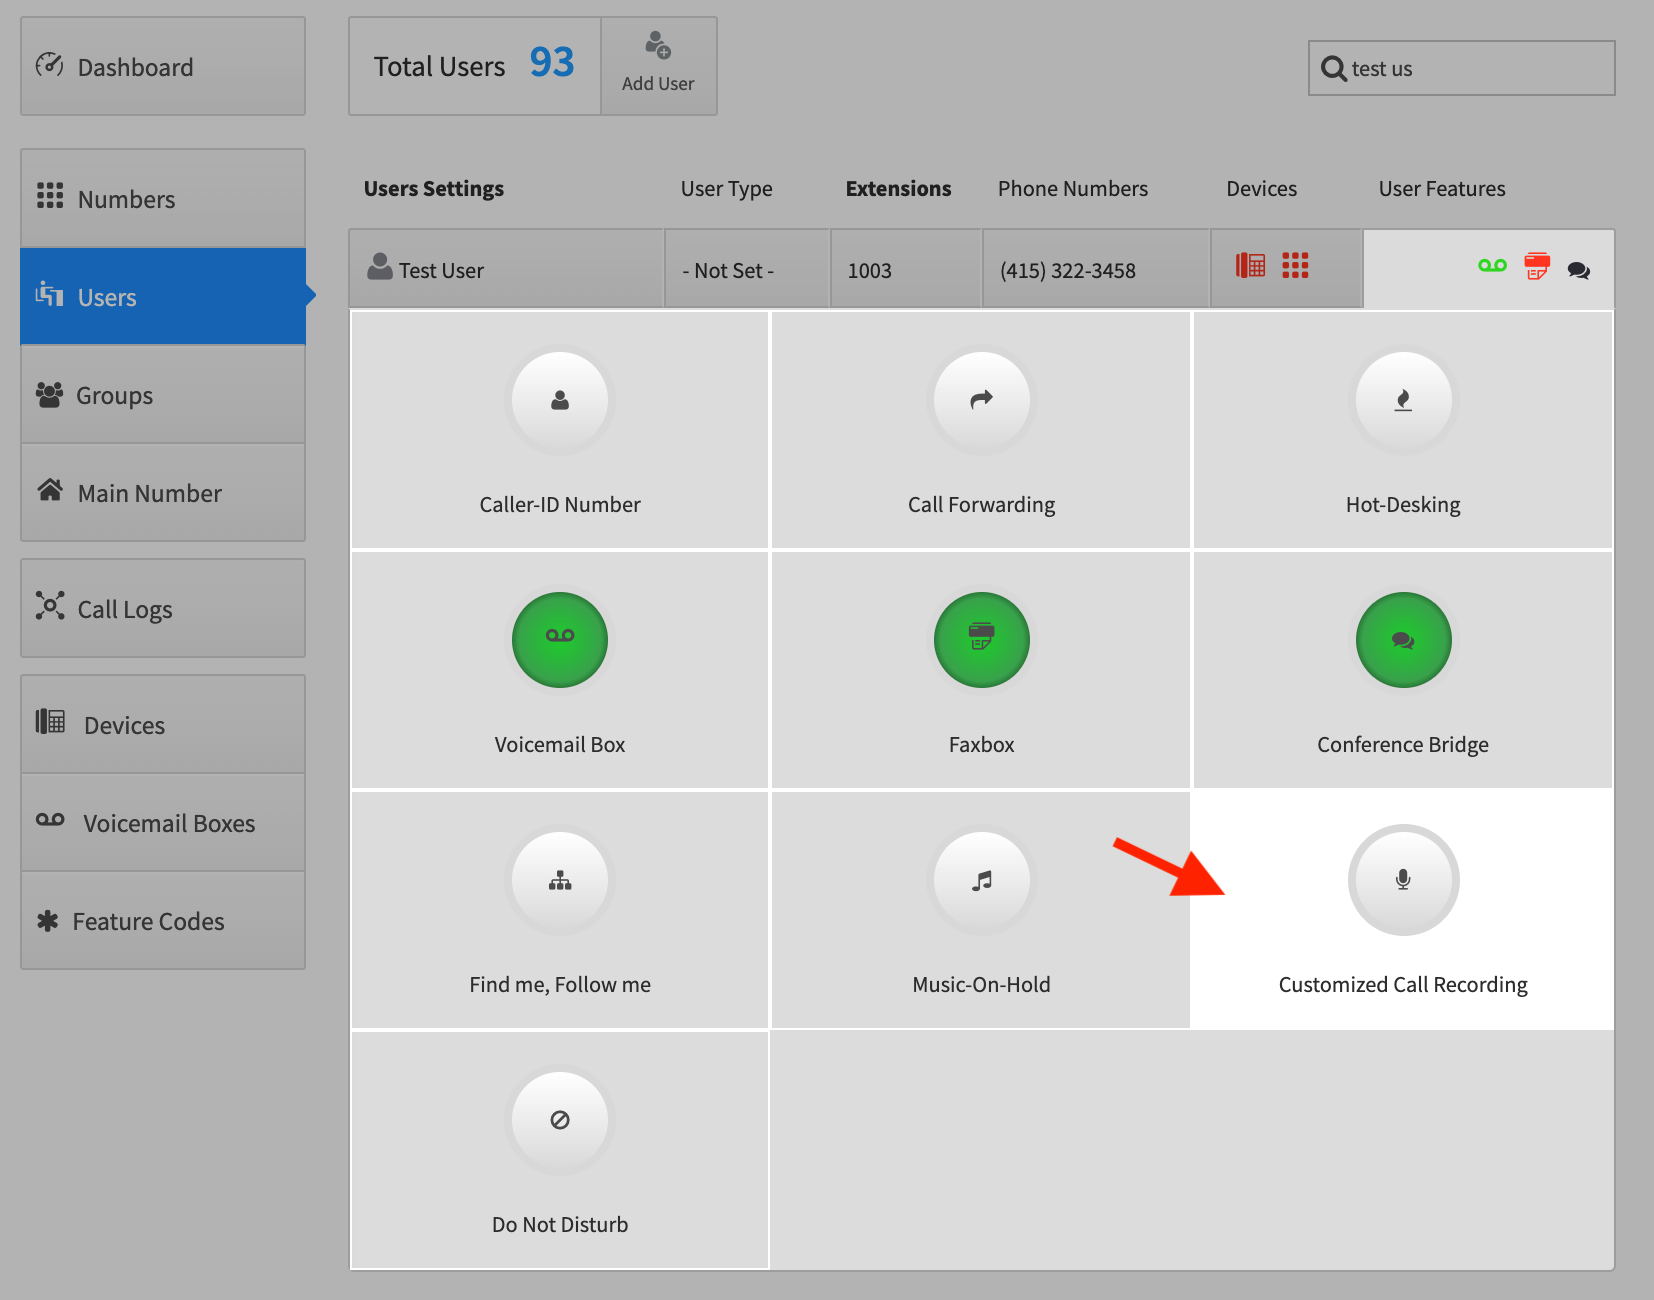
You will see the same options to control your call recordings as in the Call Recording app.
NOTE:
If no storage is configured or if the call recording app is not configured, the default action will be to use the original call recording configuration as accessed in SmartPBX under the User settings (see below).
Once call recording is enabled, you will see the Microphone icon showing in your User Features column as below.

NOTES:
- internal call recording is not turned on and an external caller is transferred from one user to another, that transferred call will stop recording once transferred to the next extension.
- Updates to this setting in SmartPBX will also update the setting in the Call Recording application and vice-versa.
Group Settings — User Features
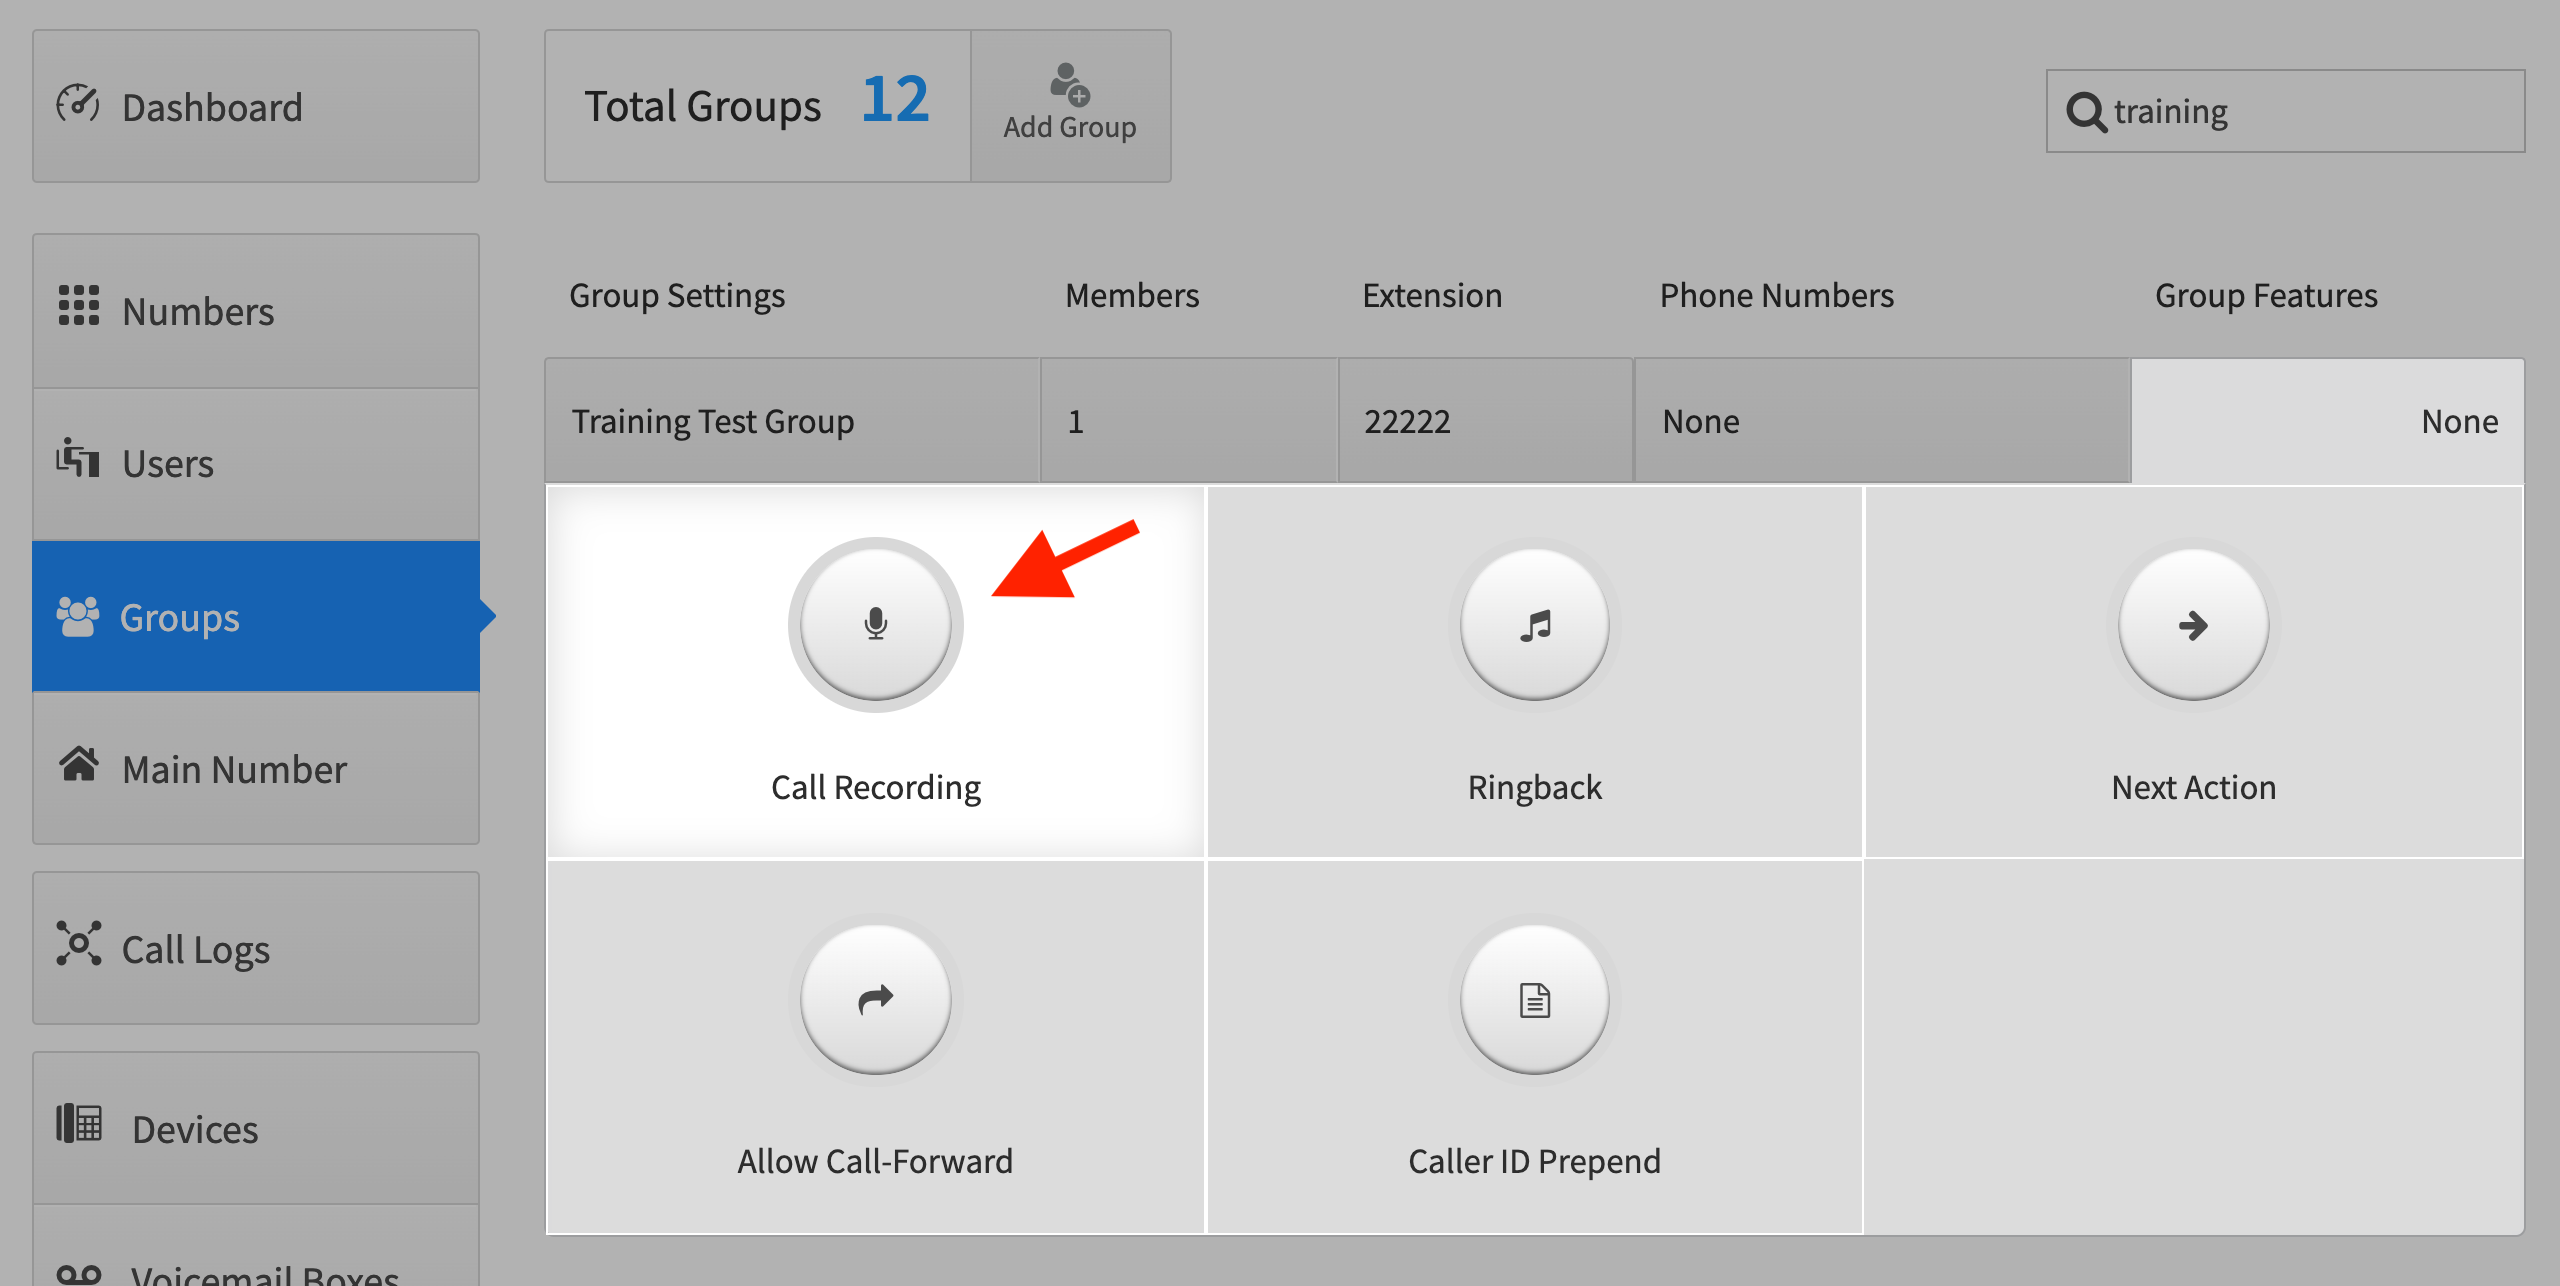
There is also a setting for call recording within a Group.
NOTE:
This is the original implementation for call recording. It is recommended you make these settings in the Call Recording app; that way you will have more visibility and access to your call recording data.
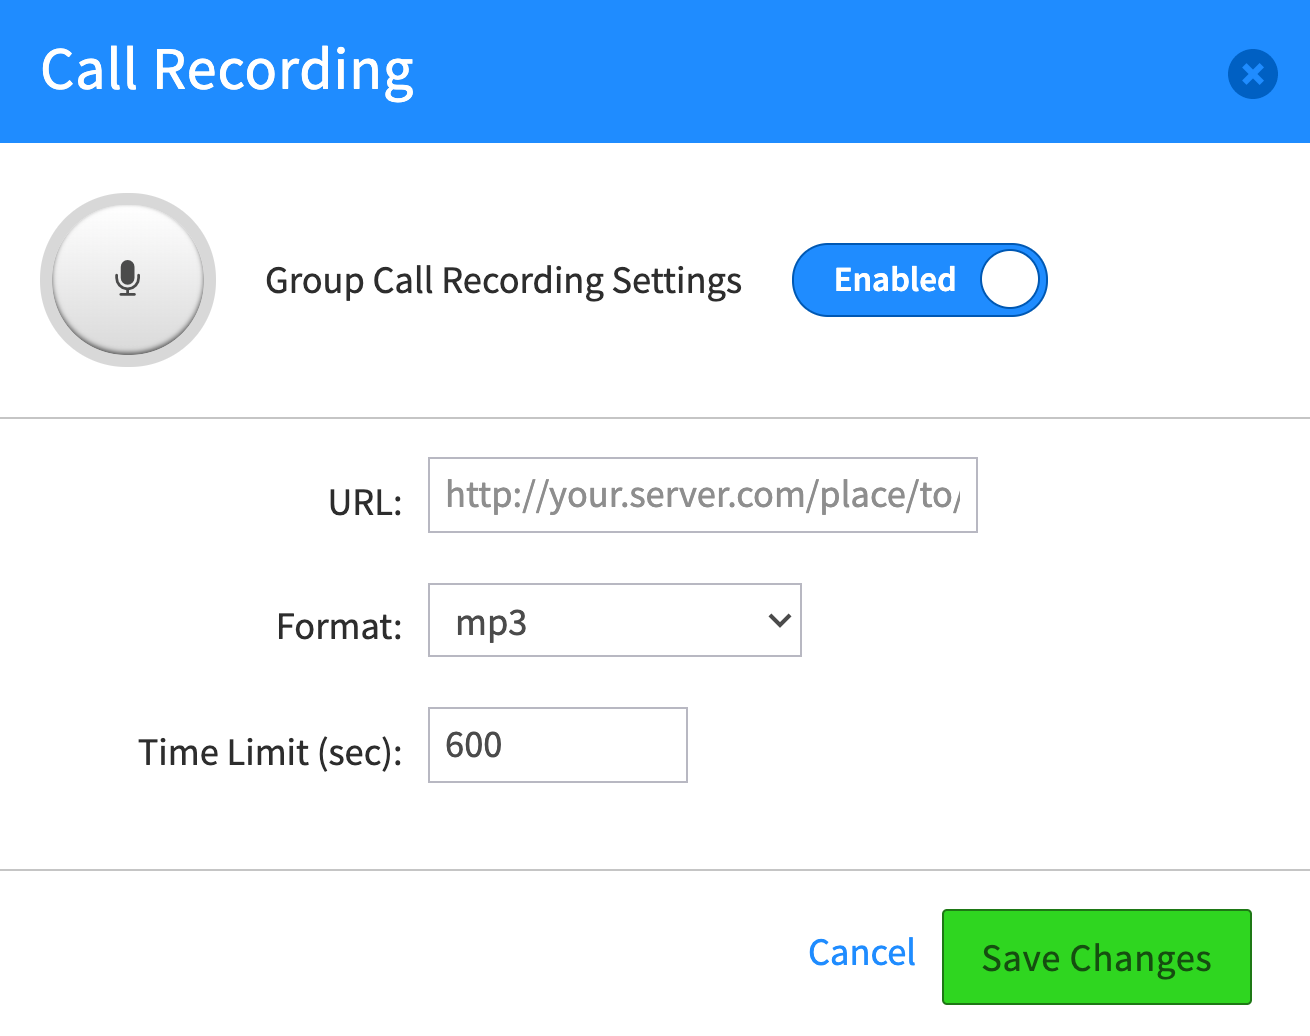
When enabled, it will provide settings for where to save your recordings, in what format, and a maximum time limit (in seconds) the recording will run.
Frequently Asked Questions, Call Recording
What settings take precedence for call recording? If my device says no and my user says yes, what happens?
If a user turns on call recording but a device has explicitly disabled it, the device will not be recorded when the user makes a call with it. If the device’s settings are left undefined, the user’s settings will be applied.
The account’s global settings are considered independently of the endpoint’s. So a user who has disabled recording, within an account that has enabled recording, will still have calls recorded according to the account’s settings.
User Level Call Recording Settings
Below are a series of charts which discribe how call recording is applied for users.
When an onnet device makes an internal call:
| Setting | Source | Destination | Recording Started |
|---|---|---|---|
| Account -> Inbound -> Onnet | onnet | onnet | yes |
| Account -> Inbound -> Offnet | onnet | onnet | no |
| Account -> Outbound -> Onnet | onnet | onnet | yes (if inbound -> onnet isn’t configured) |
| Account -> Outbound -> Offnet | onnet | onnet | no |
When an onnet device makes an external call:
| Setting | Source | Destination | Recording Started |
|---|---|---|---|
| Account -> Inbound -> Onnet | onnet | offnet | yes |
| Account -> Inbound -> Offnet | onnet | offnet | no |
| Account -> Outbound -> Onnet | onnet | offnet | no |
| Account -> Outbound -> Offnet | onnet | offnet | yes (if inbound -> onnet isn’t configured) |
When an offnet device makes an internal call:
| Setting | Source | Destination | Recording Started |
|---|---|---|---|
| Account -> Inbound -> Onnet | offnet | onnet | no |
| Account -> Inbound -> Offnet | offnet | onnet | yes |
| Account -> Outbound -> Onnet | offnet | onnet | yes (if inbound-offnet isn’t configured) |
| Account -> Outbound -> Offnet | offnet | onnet | no |
ENDPOINT SETTINGS
Below is a series of charts which will describe how call recording is applied based on the endpoint.
When an onnet device makes an internal call:
| Setting | Source | Destination | Recording Started |
|---|---|---|---|
| Endpoint -> Inbound -> Onnet | onnet | onnet | yes¹ |
| Endpoint -> Inbound -> Offnet | onnet | onnet | no |
| Endpoint -> Outbound -> Onnet | onnet | onnet | yes |
| Endpoint -> Outbound -> Offnet | onnet | onnet | no |
When an onnet device makes an external call:
| Setting | Source | Destination | Recording Started |
|---|---|---|---|
| Endpoint -> Inbound -> Onnet | onnet | offnet | no |
| Endpoint -> Inbound -> Offnet | onnet | offnet | no |
| Endpoint -> Outbound -> Onnet | onnet | offnet | no |
| Endpoint -> Outbound -> Offnet | onnet | offnet | yes |
When an offnet endpoint makes a call to an onnet device:
| Setting | Source | Destination | Recording Started |
|---|---|---|---|
| Endpoint -> Inbound -> Onnet | offnet | onnet | no |
| Endpoint -> Inbound -> Offnet | offnet | onnet | yes |
| Endpoint -> Outbound -> Onnet | offnet | onnet | no |
| Endpoint -> Outbound -> Offnet | offnet | onnet | no |
Fequently Asked Questions:
Here are a few questions that get asked on a regular bases.
How long are call recordings saved for?
Call Recordings are stored for a minimum of 1 year from the date the recording was made. If you require a longer storage period than we suggest off loading the recordings to a cloud storage platform. This can be done via our API. We also offer Storage management plans which allow you to move your recordings and other important MetaData off platform to a secured solution. If you would like more information about Storage Management Plans, please contact sales.
Can I start recording a call once I’ve answered it, mid-call?
Yes. In the Call Recording app at the account level there is a setting to enable On-Demand (in-call) Call Recording that applies to the account as a whole. Once checked, the administrator can assign a feature code to trigger the recording on.
NOTE: If this is enabled make sure your user base is trained in legal requirements that may apply to announce you are recording the call.
Can I pause a recording in the middle of a call?
Yes, you can stop a recording using the feature code you pressed to start the recording. If however you want to re-start recording during the same call, the first portion of your recording will be overwritten. An update is in progress to identify the restart as a separate recording.
